Many thanks to friend of Balintore Castle, Steve Scooby Fairweather, for finding the probate record for David Lyon, the first owner of Balintore Castle. In fact, Steve has been piecing together the history and ownership of Balintore Castle with a zeal far exceeding my own, and I hope to present some more of his findings on this blog when I find the time.
You can see that David Lyon died in Nice, France 12 years after the construction of Balintore. At the time of his death, Lyon owned a property in town (31 South Street, Park Lane); an English country estate (Goring Hall); and a Scottish shooting lodge (Balentore Castle). The contradicts earlier anecdotal information I had heard that Lyon sold the castle one or two years after commissioning it: providing quite a mystery, but one has to go with the documentary sources however less interesting the story!
The value of the estate was revised in 1876, perhaps some hidden assets had emerged. In any case, there is no doubt that David Lyon was an extremely wealthy man. I have included one other probate record for comparison. Indeed Lyon is portrayed in Disraeli's diary as a 'celebrated yachter' and a 'very rich' man. I am quite certain David Cameron has no such diary entry about me. :-)
Saturday, 19 December 2015
Friday, 18 December 2015
Highly Arch
While most of the original fireplaces at Balintore Castle have long since been removed or smashed-up, most of the cast iron inserts are still there. In the dressing room, once used by a previous resident called Lady Langman, not only is the insert in-situ, but so is the original heath stone. In short, this location is ripe for a replacement fire surround. Lady Langman was known in the family as "Aunt Nellie", so the room has become affectionately known as Aunt Nellie's dressing room.
Andy sent me the following two photos so there could be no ambiguity regarding the dimensions of the insert. You can see that the height is 39" which is the maximum standard size, but that the width is 42" which is much wider than normal. In fact you can see the 2" wide cast iron extension strip on the left-hand side of the insert. Many of the inserts at Balintore have been super-sized using these strips. It is extraordinary that the even the fireplaces in the dressing rooms at Balintore are larger than fireplaces found in the reception rooms of big Victorian houses, and so any antique fireplaces I buy have to be on the colossal side.
Normally, there is some leeway with sizes as a fireplace with a smaller opening can still fit around a larger insert - no-one sees how much of an overlap there is! Fortunately, so far I have managed to get the scale of replacements more or less correct.
However, Aunt Nellie's dressing room fireplace is the biggest challenge yet. You can see that the top of the arch comes, very unusually, within half-an-inch of the top of the insert so there is only half-an-inch to play with. The inserts of the big reclaimed fireplaces I have bought all seem to have an opening height of 37½", which would cut off a considerable proportion of the top of the arch and look aesthetically wrong.
Thinking caps on! I have a St Anne's marble fireplace which has slate detailing and a slate hearth slab for this which is ¾" thick. If I build a base unit for each of the two fireplace legs from two thicknesses of the slate heath, copying the existing slate detailing, then surely that would look OK as well as raising the height by 1½" and so take the opening height from 37½" to a perfect 39".
Below are my plans for the fireplace's discreet and tasteful "shoe lifts". Click on the image for higher resolution.
You can access the plans in FIG, PDF and JPG formats here.
It was a great source of pleasure to draw-up these plans: technical drawing was a subject I loved at school and during the two hours lessons I entered an state of consciousness I have never experienced anywhere else - a rapt, absorbed, all-consuming, chilled, calming and almost meditative concentration.
Needless-to-say, setting up the drawing package on my PC took several frustrating hours, whereas the drawing itself only took a meditative 30 minutes! :-) The non-geeks need not read the next sentence. I used the cygwin version of xfig running under Windows with the cygwin x-server running in another window! I did all my Ph.D. diagrams in xfig, and learning any drawing package is always a big investment in time.
Reverse engineering the fireplace by measuring it and, in particular, by studying the combinations of profiles used, revealed a careful use of geometric proportion as well as imperial units. :-) And altering the fireplace by following the same rules felt almost pre-destined. You often see antiques which have been altered over the years, by their respective owners, to be fit for purpose for the next generation. I was delighted to be part of this august tradition. However, even such a minor alteration would be quite costly if it were to be done by a modern stone mason, and I have subsequently measured a massive fireplace I bought that has not yet been delivered to the castle: its opening is 38" (H) x 41" (W). This would cut off just the top half-inch of the outermost edge of the arch, which I think would just be about OK and the width is perfect. Again, it's extraordinary that this monumental fireplace, which I bought at an auction outside Ascot, is only just big enough for a dressing room at Balintore
Andy sent me the following two photos so there could be no ambiguity regarding the dimensions of the insert. You can see that the height is 39" which is the maximum standard size, but that the width is 42" which is much wider than normal. In fact you can see the 2" wide cast iron extension strip on the left-hand side of the insert. Many of the inserts at Balintore have been super-sized using these strips. It is extraordinary that the even the fireplaces in the dressing rooms at Balintore are larger than fireplaces found in the reception rooms of big Victorian houses, and so any antique fireplaces I buy have to be on the colossal side.
| insert has height of 39" |
| insert has width of 42" |
Normally, there is some leeway with sizes as a fireplace with a smaller opening can still fit around a larger insert - no-one sees how much of an overlap there is! Fortunately, so far I have managed to get the scale of replacements more or less correct.
However, Aunt Nellie's dressing room fireplace is the biggest challenge yet. You can see that the top of the arch comes, very unusually, within half-an-inch of the top of the insert so there is only half-an-inch to play with. The inserts of the big reclaimed fireplaces I have bought all seem to have an opening height of 37½", which would cut off a considerable proportion of the top of the arch and look aesthetically wrong.
Thinking caps on! I have a St Anne's marble fireplace which has slate detailing and a slate hearth slab for this which is ¾" thick. If I build a base unit for each of the two fireplace legs from two thicknesses of the slate heath, copying the existing slate detailing, then surely that would look OK as well as raising the height by 1½" and so take the opening height from 37½" to a perfect 39".
Below are my plans for the fireplace's discreet and tasteful "shoe lifts". Click on the image for higher resolution.
![]() |
| fireplace's "shoe lifts" |
You can access the plans in FIG, PDF and JPG formats here.
It was a great source of pleasure to draw-up these plans: technical drawing was a subject I loved at school and during the two hours lessons I entered an state of consciousness I have never experienced anywhere else - a rapt, absorbed, all-consuming, chilled, calming and almost meditative concentration.
Needless-to-say, setting up the drawing package on my PC took several frustrating hours, whereas the drawing itself only took a meditative 30 minutes! :-) The non-geeks need not read the next sentence. I used the cygwin version of xfig running under Windows with the cygwin x-server running in another window! I did all my Ph.D. diagrams in xfig, and learning any drawing package is always a big investment in time.
Reverse engineering the fireplace by measuring it and, in particular, by studying the combinations of profiles used, revealed a careful use of geometric proportion as well as imperial units. :-) And altering the fireplace by following the same rules felt almost pre-destined. You often see antiques which have been altered over the years, by their respective owners, to be fit for purpose for the next generation. I was delighted to be part of this august tradition. However, even such a minor alteration would be quite costly if it were to be done by a modern stone mason, and I have subsequently measured a massive fireplace I bought that has not yet been delivered to the castle: its opening is 38" (H) x 41" (W). This would cut off just the top half-inch of the outermost edge of the arch, which I think would just be about OK and the width is perfect. Again, it's extraordinary that this monumental fireplace, which I bought at an auction outside Ascot, is only just big enough for a dressing room at Balintore
Saturday, 14 November 2015
Technical Plans
You will undoubtedly be hugely relieved, as am I, to learn that this is the last batch of recently scanned-in castle restoration plans to be uploaded. I still have to do a final check to make sure there are no stragglers - fingers crossed.
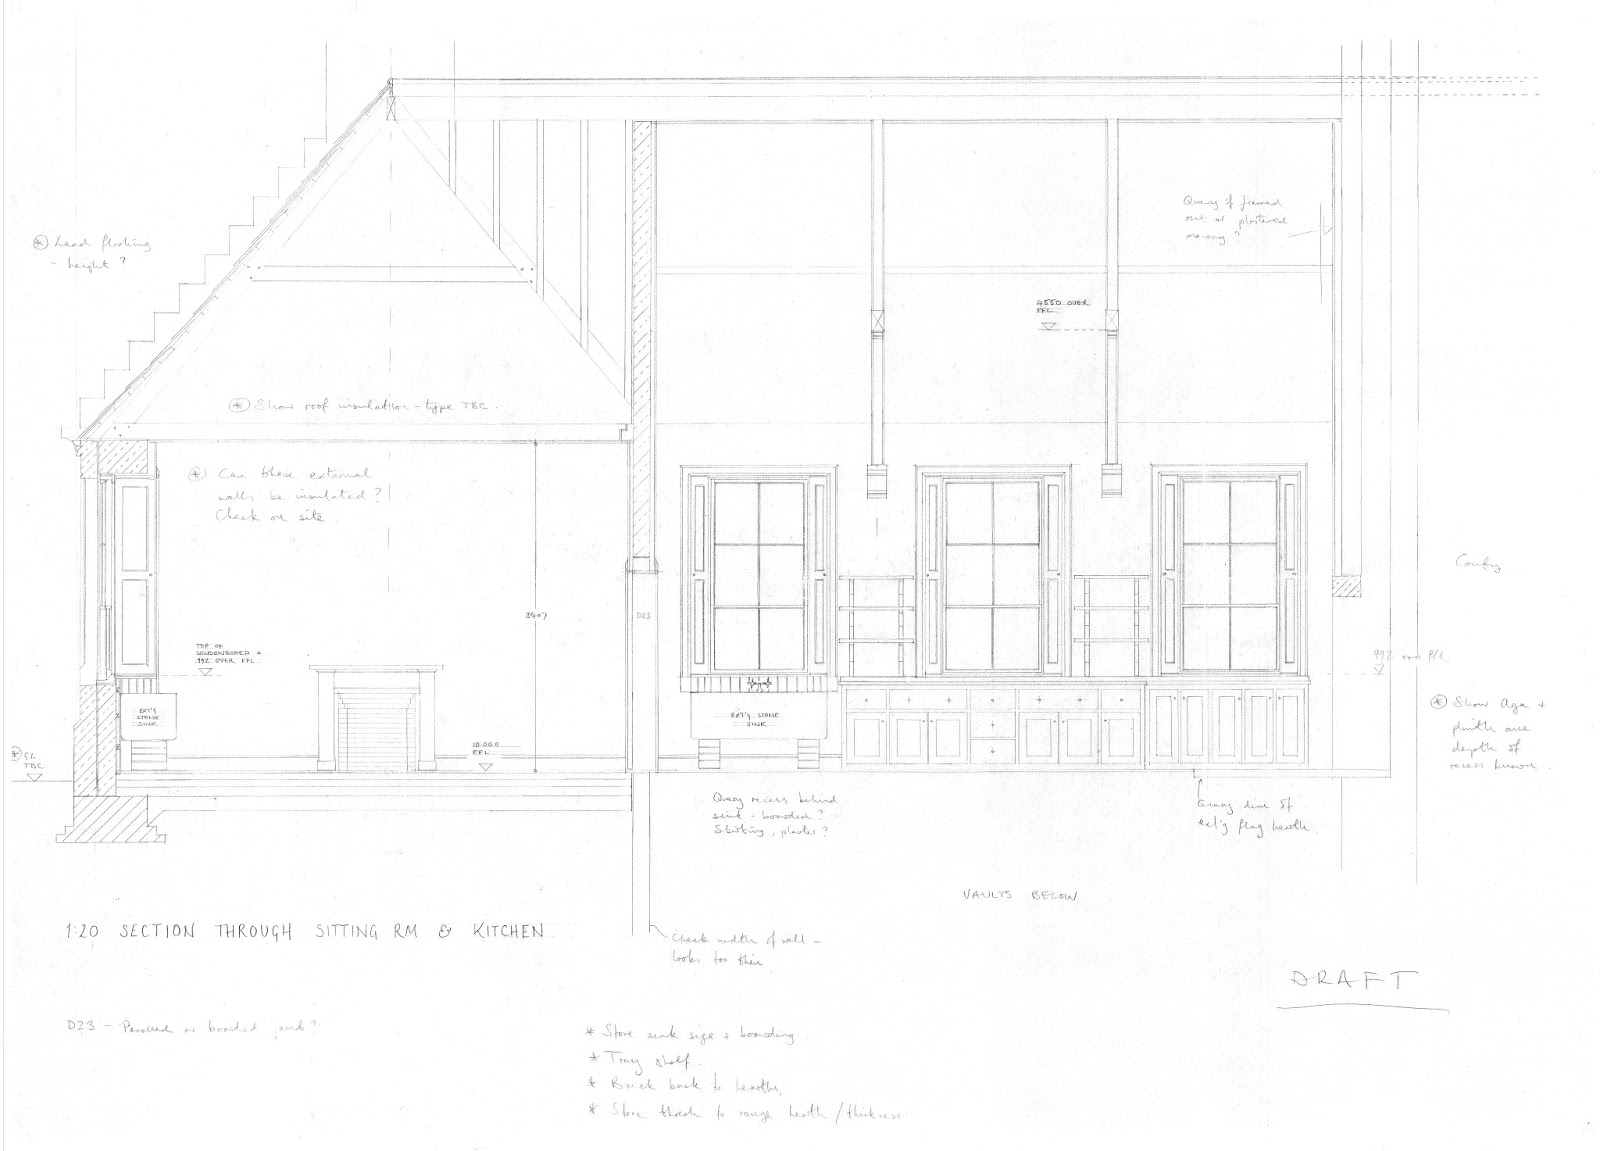
This time it's all the technical plans: roof repairs, services, insulation and floor detailing. Perhaps not as exciting as other types of plan but essential. Full resolution plans may be found on this link.
You will spot Council stamps on some of the plans, showing the hard earned granting of their official approval. The table of contents below gives a quick summary of the plans available on this blog entry.
This time it's all the technical plans: roof repairs, services, insulation and floor detailing. Perhaps not as exciting as other types of plan but essential. Full resolution plans may be found on this link.
You will spot Council stamps on some of the plans, showing the hard earned granting of their official approval. The table of contents below gives a quick summary of the plans available on this blog entry.
drawing number
|
contents
|
date
|
07-010-1
|
kitchen wing patch repairs to roof
|
5th august 2007
|
07-015-2
|
kitchen wing roof plan (proposed)
|
1st june 2008
|
07-018-3
|
kitchen wing proposed drainage plan
|
may 2013
|
07-019-4
|
kitchen wing heating and electrical
|
april 2013
|
07-020-2
|
kitchen wing section and floor details
|
may 1013
|
07-021-1
|
kitchen wing wall insulation details
|
may 2013
|
07-022-2
|
site plan (including levels and tank locations) proposed
|
26th november 2008
|
![]() |
| 07-010-1 kitchen wing patch repairs to roof 5th august 2007 |
![]() |
| 07-015-2 kitchen wing roof plan (proposed) 1st june 2008 stamped |
![]() |
| 07-018-3 kitchen wing proposed drainage plan may 2013 |
![]() |
| 07-019-4 kitchen wing heating and electrical april 2013 |
![]() |
| 07-020-2 kitchen wing section and floor details may 1013 stamped |
![]() |
| 07-021-1 kitchen wing wall insulation details may 2013 stamped |
![]() |
| 07-022-2 site plan (including levels and tank locations) proposed 26th november 2008 stamped |
Thursday, 12 November 2015
Replacement Door and Window Designs
Getting yet more of the newly digitised plans online ....
The good news is that there are very few window and door types at Balintore, and they are generally done to an even smaller set of patterns just at different scales. There are enough surviving examples to know exactly what all windows were like: absolutely no guesswork is involved.
One of the biggest expenses in restoring Balintore Castle, by far, is having replacement windows and doors made. Where the window or door is missing or totally rotten, a new one has to be made. However, we have done our best to incorporate surviving fabric.
The good news is that there are very few window and door types at Balintore, and they are generally done to an even smaller set of patterns just at different scales. There are enough surviving examples to know exactly what all windows were like: absolutely no guesswork is involved.
The plans below are replacement door and window designs for the kitchen wing. Some of these have already been made and installed; some have yet to be commissioned. d29 and w27 are the only items differing from the originals: w27 is a new-design window in a door opening; d29 is single panelled door, matching an existing door, with a glazed opening that replaces a stable door. The locations of these are shown in this plan.
The biggest window challenge is restoring the cathedral-like perpendicular style gothic windows in the grand saloon, but permit me the luxury of not fretting about this for now. :-) The current focus is getting the rather more manageable windows on the servant's bedroom floor reinstated. Windows are surprisingly one of the most transformative things in restoration, they bring in light, warmth and joy and create the interior space. Full high resolution versions of the plans can be found here.
![]() |
| 07-011-A-2 kitchen wing replacement sash window (w24) 23rd november 2007 |
![]() |
| 07-011-B-1 kitchen wing replacement window types 22rd august 2008 |
![]() |
| 07-011-C-1 kitchen wing new sash window (w27) 11th september 2008 |
![]() |
| 07-013-A-1 kitchen wing replacement internal panelled doors 23rd november 2007 |
![]() |
| 07-013-B-1 kitchen wing replacement boarded door (d28) 11th september 2008 |
![]() |
| 07-013-C-1 kitchen wing replacement hopper type boarded door (d29) 11th september 2008 |
Wednesday, 11 November 2015
Balintore Castle Watercolour Dated 1864
I was wildly delighted to receive this image by email today from my architect Dr. Paul Bradley, who has recently purchased the original watercolour.
I did not know such a picture existed, but to me it tells a number of stories.
The picture was painted just 4 years after construction of the castle, so it must be associated somehow with the original owner David Lyon and it is very much the castle, in newly constructed pride, saying "look at me". It looks to be painted by a talented amateur rather than a professional artist, so I would guess the artist was a member of the shooting party shown. Sketching and painting were very much the hobbies of the day.
There are 4 ladies and 3 gentlemen in the scene, so I am guessing the artist is the missing 4th gentleman. Gentlemen and ladies paint architecture in different ways, and this has a male cast. It is likely that his lady friend is the figure in the foreground writing or sketching - a shared common interest no doubt. Does the lady have a small easel at her feet?
The vegetation is almost non-existent in the image: the castle's terrace was leveled in 1860 so there has only been 4 years growing time. Today, there are tall trees to the right and huge yews to the left. I always thought it would be a shame if any of the trees died, but the terrace without the trees has a exposed raw beauty of its own.
There is a balustraded stone wall to the rear of the picture. I never knew such a wall existed, but it could, if not artistic licence, explain a long-standing mystery. The earliest photo of the castle (c 1860) shows no balustrading on the inner courtyard wall on the left hand side of this image. It is not shown here, in 1864, either. However, a photograph of 1923 shows the courtyard wall to be balustraded. I am now wondering if the balustrading was moved during the history of the castle? Perhaps the garden wall got damaged in some way, so the balustrading was consolidated on the shorter run of the courtyard wall?
I was told about a cannon in front of the castle, in living memory, I would guess the 1950's. There is a cannon in this picture, so could it be the one and the same? I had no idea this feature could have gone right back to the earliest days of the castle.
The figures are depicted in a way that seems more 18th Century or even 17th Century - no doubt the old-world romance of the Highlands, as penned by Sir Walter Scott, is the aim!
What could the red flag be? Surely it must be an artistic confection, as I cannot think of any relevant flags that would fit. The artist has picked out the red hem of his lady friend's dress and hem of the dress of the lady on the pony riding side-saddle, suggesting he was using his red brush as embellishment.
The mist lying in the valley below is one of my favourite looks too.
The castle's spelling is old form "Balentore" as seen on the original architectural plans, rather then the current "Balintore". I wondered whether the plans' spelling was an aberration or mistake, but the evidence here now suggests this was the received spelling in the 1860's.
Hope you enjoyed my Sherlock Holmes dissection of the picture.
![]() |
| 1864 Watercolour of Balintore Castle |
Tuesday, 10 November 2015
Visualisations of Proposed Kitchen Wing
A further series of belated digital scans...
After making Balintore Castle weatherproof, the plan was to make the kitchen wing habitable. This is a clear no-brainer. The kitchen wing is in relatively better condition than the rest of the castle. Being single-storied (with part basement) and smaller in scale, the complete restoration to comfortable dwelling should in theory be quite achievable. Practice, of course, is something else. Getting planning permission for this took 7 years, only finally coming through in 2014.
You can imagine my despair during this period! The worse part was being in the castle in the middle of two of the coldest winters on record, unable to do anything to keep the heat from escaping out of the building. I am more than familiar with the onset of hypothermia. The only solution is to get into bed with an electric blanket under three duvets, no matter the time of day or night. This was the only way of keeping any heat around one's body. I have a huge wood-burner which under normal domestic circumstances would be more than enough to heat a very large room.
The irony is that I want to keep the building as close as possible to its Victorian state i.e. there is absolutely nothing contentious in the plans.
The first image shows the floor plan, and how the service rooms have been converted into domestic accommodation. The meat larder becomes a bathroom; the dairy larder becomes a utility room, you get the idea.
As far as the external appearance is concerned this will hardly change - see the second image. One door opening will become a window (matching the others), and a stable door (now missing) will become a single panel door.
The interesting action takes place with the internal courtyard. The covered walkway will be glazed in - see the third image. This allows two service rooms to be brought into the body of the accommodation. One of these will be the second of two bedrooms. Even though the kitchen is spectacularly large, the kitchen wing still only forms a two bedroom dwelling, so it was important to reclaim that second bedroom.
The fourth image shows the interior of the kitchen and some proposed kitchen units. As we all know, the Victorians did not have kitchen units, but my architect has done a good job in designing something that is practical and somehow "period-credible". Is that a thing?
Anyhow, the full resolution scans can be found on this link. The images below are limited in size by Google!
![]() |
| 1. proposed floor plan for kitchen wing |
![]() |
| 2. proposed north and east elevations |
![]() |
| proposed courtyard with glazed walkway |
![]() |
| proposed kitchen interior |
Sunday, 8 November 2015
Castle Survey 2007
One of the obligations when I bought Balintore Castle in 2007 was to provide Angus Council with a survey of the castle at time of purchase. The resulting plans, photographic survey and inventory constitute a historic "snap-shot" of the building pre-restoration. Many thanks to Dr. Paul Bradley for his artful and accurate draftsmanship. He even recorded the holes in the floors and the vegetation on the building.
However, I have only just managed to digitally scan-in the plans and thought this blog would be the best place to make these publically available. I needed some window plans scanned-in for email communication, and thought it was about time to get the lot done.
Below the survey's floor-by-floor plans are presented in bottom to top order, and then the elevations are presented in anti-clockwise order starting from the west entrance façade. The images in this blog are limited by Google to be around 1k x 1k resolution, however you can access the original 8k x 8k scans on this link for the high resolution versions.
![]() | |
|
![]() |
| PRINCIPAL FLOOR PLAN (EXISTING) 31st March 2007 |
![]() |
| FIRST FLOOR PLAN (EXISTING) 31st March 2007 |
![]() |
| ATTIC FLOOR PLAN (EXISTING) 31st March 2007 |
![]() |
| WEST ENTRANCE ELEVATION (EXISTING) 31st March 2007 |
![]() |
| SOUTH ELEVATION (EXISTING) 31st March 2007 |
![]() |
| EAST ELEVATION (EXISTING) 31st March 2007 |
![]() |
| NORTH ELEVATION (EXISTING) 31st March 2007 |
Subscribe to:
Posts (Atom)