As I have a background in image processing, I though it would be fun to try to find an algorithm to remove the watermark. You can judge for yourselves how well I have done at the end of this blog entry. That's one way to keep you reading. :-)
Here is the original watermarked image:
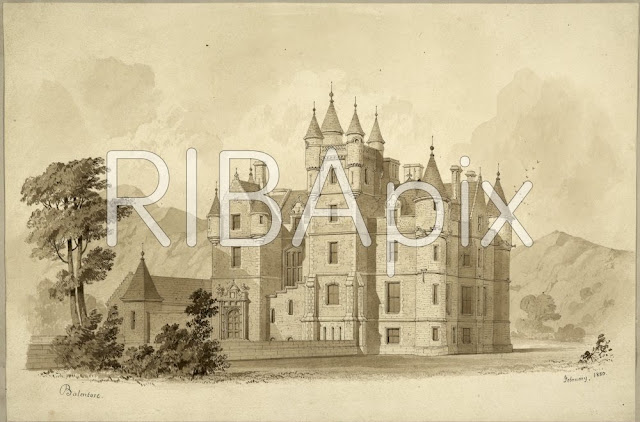 |
| original watermarked image of castle |
There are essentially 3 different areas in the image:
- untouched area outside of letters
- black line around letters
- area inside letters with reduced colour and contrast
|
As the image inside the letters is black and white and has been reduced in contrast, I wondered if this could give any clues for reconstruction? I looked at the hue (colour channel) and the saturation (colour intensity channel). There was little discernible information in the hue, but the saturation image below was a revelation and give insight into the solution.
 |
colour saturation channel
N.B. letters have near 0 colour saturation i.e. no colour information |
You can see that the saturation inside the letters is essentially zero (shown by the deep black colour). This means that parts of the region inside the letters are distinguished by low saturation, and therefore can be treated differently in the restoration.
I threshold the saturation image looking for low saturation regions. By choosing a suitable value (around 47), everything below this was essentially a letter, shown by the coloured regions below. I have coloured connected regions different colours and this information is useful in the next stage.
 |
| letters thresholded from saturation and split into connected regions |
In the image above there is some noise i.e. small blobs that do not form part of a letter. By eliminating small regions (less than 170 pixels), then one arrives at the 7 large regions below. Letters successfully detected! :-)
 |
| small "noise" regions removed |
By growing and shrinking the letter regions, by image processing techniques called dilation and erosion respectively, one can create an edge region as below. It is important that this edge region totally covers the black letter boundary so we can remove this. By trial and error, I had to do 1 shrink operation and 2 grow operations.
 |
| edge mask created from large connected regions |
The image below may look little different from the starting-point watermarked image. However, the black boundary is now the "edge mask" I have created. Inside the letters I have increased the contrast of the black and white image to exactly match the contrast of the surrounding sepia image. This is done by a "histograming technique" making the histogram of intensity distributions of the inner image match that of the outer image.
As well as the "edge mask", I have a "letter mask" for the inside of the letters which is essentially the same as the earlier coloured blobs.
 |
| image outside letters + edge mask + contrast enhanced image inside letters |
I now want to fill in the missing detail! :-) Inside the letters I need to supply the missing hue and saturation information. In the edge mask region I need to supply the missing colour, saturation and intensity information. Thankfully there is an image processing technique called "in painting" for filling in missing regions. You will be familiar with this technique, as it the one used to digitally removes scratches from photographs.
So in simple terms, the hue and saturation information is in-painted inside the letter masks, and the intensity information is in-painted inside the edge mask. The eye is less sensitive to hue and saturation information so the large degree of inaccurate guesswork inside the big letter regions is not a problem. However, when intensity information is in-painted inside the letter mask, this looks dreadful. The eye is incredibly sensitive to intensity information. It was therefore necessary to in-paint intensity in the smallest possible region i.e. just the edge mask, and to use the intensity information inside the letters - which demanded the complex histogram work!
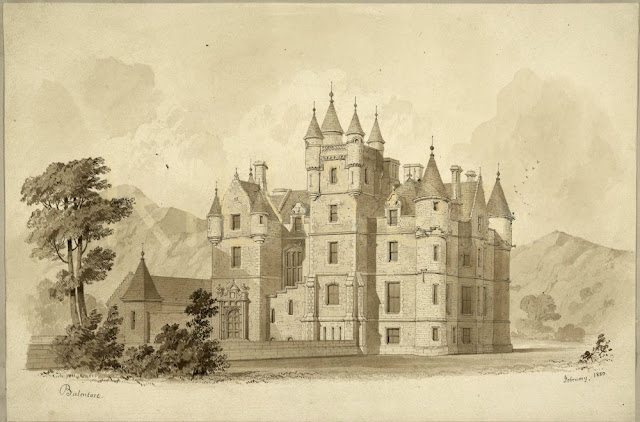 |
| missing parts of image filled-in |
Anyhow, how did I do? You can see the resulting final in-painted image above. Some faint echos of the watermark are visible on the left hand side of the image. If I was a digital artist I could paint these out. :-) But as a mere programmer, the point of diminishing returns has been reached and this is the best I can do on a Sunday morning! :-) The code is appended.
import numpy as np
import os
import random
import cv2
from skimage.morphology import binary_dilation, binary_erosion

def hist_match(source, template, ignore_black = True):
    """
    https://stackoverflow.com/questions/32655686/histogram-matching-of-two-images-in-python-2-x
    Adjust the pixel values of a grayscale image such that its histogram
    matches that of a target image

    Arguments:
    -----------
        source: np.ndarray
            Image to transform; the histogram is computed over the flattened
            array
        template: np.ndarray
            Template image; can have different dimensions to source
    Returns:
    -----------
        matched: np.ndarray
            The transformed output image
    """

    oldshape = source.shape
    source = source.ravel()
    template = template.ravel()

    # get the set of unique pixel values and their corresponding indices and
    # counts
    s_values, bin_idx, s_counts = np.unique(source, return_inverse=True,return_counts=True)
    if ignore_black:
        s_counts[0] = 0

    t_values, t_counts = np.unique(template, return_counts=True)
    if ignore_black:
        t_counts[0] = 0

    # take the cumsum of the counts and normalize by the number of pixels to
    # get the empirical cumulative distribution functions for the source and
    # template images (maps pixel value --> quantile)
    s_quantiles = np.cumsum(s_counts).astype(np.float64)
    s_quantiles /= s_quantiles[-1]
    t_quantiles = np.cumsum(t_counts).astype(np.float64)
    t_quantiles /= t_quantiles[-1]

    # interpolate linearly to find the pixel values in the template image
    # that correspond most closely to the quantiles in the source image
    interp_t_values = np.interp(s_quantiles, t_quantiles, t_values)

    returned_image = interp_t_values[bin_idx].reshape(oldshape)
    return returned_image.astype(np.uint8)

def coloured_image_to_edge_mark(coloured_image):
   image_sum = coloured_image[:,:,0] + coloured_image[:,:,1] + coloured_image[:,:,2]
   mask = image_sum > 0
   return mask

def triple_mask(mask):
    return np.stack( [mask]* 3, axis = 2)

def get_inner_and_outer_masks(mask):
    inner_mask = binary_erosion(binary_erosion(binary_dilation(mask)))
    inner_pixel_count = np.count_nonzero(inner_mask)
    #inner_mask = mask
    outer_mask = binary_dilation(binary_dilation(mask)) # no colour abnormaility
    outer_pixel_count = np.count_nonzero(outer_mask)
    print("inner_pixel_coint = ",inner_pixel_count)
    print("outer_pixel_count = ",outer_pixel_count)
    return inner_mask, outer_mask

def balance_histograms_using_v(inner, outer):
    """
    make RGB image inner have the same brightness (i.e. v) histogram as image outer
    """
    inner_v_before, inner_hsv = rgb_to_intensity(inner)
    outer_v,        outer_hsv = rgb_to_intensity(outer)
    inner_v_after = hist_match(inner_v_before, outer_v)
    inner_hsv[:,:,2] = inner_v_after                   # edit V channel only
    return cv2.cvtColor(inner_hsv, cv2.COLOR_HSV2BGR)  # return as BGR

def fill_in(io, edge_mask, outer_mask):
    """
    http://opencv-python-tutroals.readthedocs.io/en/latest/py_tutorials/py_photo/py_inpainting/py_inpainting.html
    """
    fill_in_method = cv2.INPAINT_TELEA # other choice cv2.INPAINT_NS - makes little visible difference
    io_hsv        = rgb_to_hsv(io)
    h_before      = io_hsv[:,:,0]
    s_before      = io_hsv[:,:,1]
    v_before      = io_hsv[:,:,2]

    outer_mask_uint    = np.where(outer_mask,255,0).astype(np.uint8)
    s_after   = cv2.inpaint(s_before, outer_mask_uint, 15, fill_in_method)       # use outer mask to fill in saturation
    h_after   = cv2.inpaint(h_before, outer_mask_uint, 15 ,fill_in_method)       # use outer mask to fill in hue
    v_after   = cv2.inpaint(v_before,       edge_mask,  2, fill_in_method)  # use edge to fill in hue

    io_hsv[:,:,0] = h_after
    io_hsv[:,:,1] = s_after
    io_hsv[:,:,2] = v_after
    return hsv_to_rgb(io_hsv)

def rgb_to_hsv(im):
    return cv2.cvtColor(im, cv2.COLOR_BGR2HSV)

def hsv_to_rgb(im):
    return cv2.cvtColor(im, cv2.COLOR_HSV2BGR)

def rgb_to_intensity(im):
     hsv  = rgb_to_hsv(im)
     return hsv[:,:,2], hsv

def make_random_colour_map_with_stats(stats, pop_thresh = 0):
    n = len(stats)
    colour_map = np.zeros( [n, 3], dtype=np.uint8)
    for i in range(n):
        if ( (pop_thresh != 0) and (stats[i][4] < pop_thresh) ) or  (i == 0):
             colour_map[i] = [0,0,0]                            # make small regions and region 0 (background) black
        else:
            for j in range(3):
                colour_map[i,j] = 1 + random.randint(0,254)     # big regions are a non-zero random colou
    return colour_map

"""

Image comes from here

https://www.architecture.com/image-library/RIBApix/licensed-image/poster/balintore-castle-angus-the-entrance-front/posterid/RIBA65186.html
"""

def display_and_output_image(name, im):
    cv2.imshow(name,im)
    file_name = os.path.join( "C:\\Users\\david\\Desktop\\", name + ".jpg")
    cv2.imwrite(file_name,im)


def create_letter_mask(image_saturation):
    """
    https://stackoverflow.com/questions/35854197/how-to-use-opencvs-connected-components-with-stats-in-python

    threshold saturation to detect letters (low saturation)
    find big connected components (small connected components are noise)
    """
    connectivity = 4
    ret, thresh_s = cv2.threshold(image_saturation, 42, 255, cv2.THRESH_BINARY_INV)  # 50 too high, 25 too low
    output = cv2.connectedComponentsWithStats(thresh_s, connectivity, cv2.CV_32S)
    blob_image = output[1]
    stats = output[2]
    pop_thresh = 170
    big_blob_colour_map = make_random_colour_map_with_stats(stats, pop_thresh)
    all_blob_colour_map = make_random_colour_map_with_stats(stats)
    big_blob_coloured_image = big_blob_colour_map[blob_image]                       # output
    all_blob_coloured_image = all_blob_colour_map[blob_image]                       # output
    display_and_output_image("big_blob_coloured_image", big_blob_coloured_image)
    display_and_output_image("all_blob_coloured_image", all_blob_coloured_image)
    letter_mask = coloured_image_to_edge_mark(big_blob_coloured_image)
    return letter_mask

def main():
    """
    original image comes from here

    https://www.architecture.com/image-library/RIBApix/licensed-image/poster/balintore-castle-angus-the-entrance-front/posterid/RIBA65186.html
    """
    im = cv2.imread(r"C:\Users\david\Desktop\riba_pix_cropped.jpg")
    print (im.shape)
    display_and_output_image("image",im)
    hsv = rgb_to_hsv(im)
    image_saturation = hsv[:,:,1]                                                           # output
    display_and_output_image("image_saturation",image_saturation)

    letter_mask = create_letter_mask(image_saturation)

    # outer mask bigger than letter mask
    # inner mask smaller than letter mask
    # edge mask is between inner and outer mask and contains black line round letters (i.e. to be removed)
    inner_mask, outer_mask =  get_inner_and_outer_masks(letter_mask)
    edge_mask = np.logical_and( np.logical_not(inner_mask), outer_mask)
    edge_mask = np.where(edge_mask,255,0).astype(np.uint8)
    display_and_output_image("edge_mask",edge_mask)

    inner_image = np.where( triple_mask(inner_mask), im, 0)
    outer_image = np.where( triple_mask(outer_mask) ,0 ,im)

    balanced_inner_image = balance_histograms_using_v(inner_image,outer_image)

    before_filling_in = balanced_inner_image + outer_image                                   # output
    display_and_output_image("before_filling_in",before_filling_in)

    after_filling_in = fill_in(before_filling_in, edge_mask, outer_mask)                     # output
    display_and_output_image("after_filling_in",after_filling_in)

    cv2.waitKey(0)
    cv2.destroyAllWindows()


if __name__ == '__main__':
    main()


