Sunday 31 December 2017

Kirremuir Talk for the Saltire Society

I was invited to give a talk "The Renovation of Balintore Castle" in Kirriemuir at a Saltire Society meeting on the 26th of October this year. My first instinct, not being a natural public speaker, was to flee! However, as I enjoy going to talks myself and love watching TV programs on other historic building restorations, the hypocrisy of refusal was unsustainable.


publicity poster for my talk in Kirriemuir

To cope with the upcoming alarming prospect, I was able to pretend to myself that I wasn't actually giving a talk. However, this broke-down big-time when I was standing at the front of the audience on the night, and more and more and more people filed in. The turnout was astonishing, and more seats has to be brought in and set-up at the back of the hall. I didn't count the number, but I would estimate there were well over 200 people in the audience. Eeeek! There was even a couple from Crieff, who has supplied me several years before, with reclaimed hardwood flooring.


notice in local paper for my talk
I chatted to a lovely lady in the front row to quell my nerves. I commented on the turn-out. She replied that I might actually be the main attraction, not the talk i.e. "Who is this idiot restoring a castle outside our village?". While not the most confidence-inspiring remark, it was certainly funny enough to break the tension. :-)

I have no idea how the talk went as it is impossible to be objective, but I managed to wrap-up the talk in exactly the planned 40 minutes. I had skipped over some "contingency" slides, as I always produce extra material as I am paranoid about running out of things to say and know that for myself, at least, good preparation is essential. Anyhow, the audience demanded the extra slides and also asked some good questions. The slides are here in a variety of formats.

I was most heartened by the people that came up to me after the talk and gave me their personal memories of the castle when it was still a functioning building. If only I could have jotted down the personal reminiscences then and there - they were like a goldmine to me!

The experience confirmed in spades what I already knew, that you cannot separate a big historic building from its community. These buildings hold community memories, and bind generations together.

I am greatly amused by the fact that the Satire Society, founded in 1936 to promote Scottish culture, has chapters in Aberdeen, Dumfries and Galloway, Glasgow, Helensburgh, the Highlands, Edinburgh, New York City and Kirriemuir. If ever there was a demonstration that the "wee red toon" punches above its weight!


Purple Fungi

As we are in the depths of mid-Winter, it is timely to reflect upon a small outing Andrew and I made in the environs of the castle in the Autumn of this year. The drainage for the walled formal garden of the castle has been broken for as long as I have known the grounds, resulting in the majority of this area being a bog. The only beneficiaries of this situation are the rare orchids that flourish in the damp conditions.

Anyhow, Andrew and I decided to make a reconnaissance of all the drainage ditches in the area to see if we could gain any insight into how to ameliorate the situation without, at great expense, digging underground drainage channels in the garden itself.

As we followed a ditch through a forested area, we came across bright purple fungi, that I had never  ever seen before. This is all the more surprising as I am a student of fungi. The intensity of the purple colour was astonishing! Andrew took the photos as I did not have my phone with me at the time. 

It was one of those sunny autumn days that made one feel it could be Summer. Sadly no such mistake can be made in mid-Winter, so it is pleasant to recall this day!

Does anyone know the species? Is it the, apparently delicious, Amethyst Deceiver?


bright purple fungi near Balintore Castle

cluster of purple fungi

other fungi in the same forest

Wednesday 27 December 2017

The Quest for the Holy Radiator

One of the ongoing restoration activities for Balintore Castle is "radiator quest". How does one locate, let alone transport, sets of matching antique radiators with which to heat the castle? Factor in "on a budget", and the word impossible comes to mind. 

You can expect to pay £400 upwards for a large working Victorian radiator in good condition. I spoke to the restorer of Gagie Castle, who said "When we started there were 4 radiators in the castle, by the time we had finished there were 70". I can testify as to how a castle swallows up radiators! You don't want to do the finance math.

However, occasionally sets of radiators that are being stripped out appear on eBay before they have got to a dealer, and one just hopes that one is around to spot them. Anyhow, this blog entry shows 7 satisfyingly behemoth radiators arriving at Balintore Castle (1860) from St. John's Minster (1855) in Preston. The date is perfect. 

St. John's Minster radiators on eBay

There has been a church on the Preston site since 1094. The minster status only arrived in 2003, when Preston was made a city, but from its origins the building has always been the parish church for Preston. The Victorian building was the first church to be lit by gas.

St. John's Minster: exterior

The seller said the new radiators that were installed look horrible, but service companies nowadays will not work with anything except a total replacement solution.

St. John's Minster: interior
Transporting the radiators was a nightmare, three companies in turn agreed to move the radiators and then each in turn chickened out. Finally, I got a local firm, Campbell Lemon, who has proven reliable in the past to do the moving. The small crane on the lorry was essential. We moved the two largest radiators into the entrance hall to get them out of the rain - they had never been stored outside. The two of us then attempted to move them by hand: there was no way this was going to happen and we laughed at the futility of our ambition. It would have needed at least 5 strong people for each one. And yes, the entrance hall was blocked for a considerable time afterwards! :-)


moving radiators into castle

The radiator style is Princess, a substantial two column design which is my favourite. I suspect this because the radiators in my Victorian primary school were gold-painted Princess radiators. Sitting on top of these mammoth radiators in the corridors on freezing cold days, is one of those joyous memories from childhood. I had bid on previous lots of Princess radiators but nothing had worked out, so this relativity large batch turning up at an affordable price was an opportunity not to be missed.


the two largest radiators in the entrance hall
The Preston radiators are so large that I suspect I may never find the like again, and I thought about installing them in some of the large principal rooms, which will need heavy duty heating. However, I have to think strategically and put the radiators in rooms which will be commissioned earlier rather than later, and the corridor from the front door to the kitchen wing and the servants' hall are prime candidates for heating. In fact, these two spaces swallow up all 7 radiators quite adequately! I obviously need yet more radiators.

The previous batch of radiators from Albertopolis, two of which are shown here will most likely be used to heat the entrance tower. In that way zones of the castle, at least, will have matching radiators. The odds of finding a castle-sized batch of antique radiators is vanishingly small.


Wednesday 20 December 2017

Christmas 2017: Serendipitous Art

I was wondering what image to use on this year's Christmas missive given I have no
photos from this winter of Balintore in this snow. There hasn't been a shortage of snow, just I haven't been around at the same time.

Anyhow these thoughts were going round my brain, at the same time as I was driving
back from a nearby auction house (Special Auction Services, just south of Newbury)
having picked up a watercolour, which I had won to my great surprise with a low bid of £20.


Eurika! I should use the watercolour's image as my Christmas card. OK, so the watercolour is an image of spring (primroses and hyacinths) but these are very much a sign that winter is over which we all want i.e. Christmas is compensation but primroses and hyacinths are the real deal.

Spring flowers, hyacinths and primroses
by Albert Durer Lucas 

The narrative journey to this watercolour is a strange one. I had been buying essential furniture for Balintore at auction, but avoided paintings, as I regarded them as a frippery. Eventually, I bought a job lot of Victorian prints for around £20, and as soon as I put them on the wall I could see the transformative effect. A Victorian ambiance needs wall art, and the greater the profusion, the better things work.


I grew up in a household that revered great art, and like my father I realised that it was not worthwhile bothering to buy any as one would be disappointed. It was therefore a revelation and a release to realise, that Balintore did not need great art, just quintessential art of the Victorian era to correctly set the scene.

Since then, I have been on the look-out for inexpensive and suitable items. The 19th Century watercolour had a guide-price of £80-£100, but something told me that the
art was a cut-above so I made a speculative low bid not expecting anything to happen.

After I found out I had won the item I did my internet research to find out the name of the (unattributed) artist by doing image searches based on the subject of the painting. I tracked down my man in less than a minute, There was no mistake, I had a work by Albert Durer Lucas (British, 1828-1918). 

Albert was the son of sculptor Richard Cockle Lucas and exhibited mainly in London between 1859-78 with the Royal Institute and the Society of British Artists.  He painted small, detailed studies of flowers and foliage, sometimes with butterflies and other insects. In 1910 he caused a sensation by revealing that his  father was the real author of a bust of Flora which had recently been bought by the Berlin Museum as a Leonardo.

If the Web is to believed, and it frequently isn't, his watercolours fetch £500-£700 and his oil paintings fetch £1000-£1500 I love Albert's work. These are not the effete nature studies of the parlour, but nature in looming confrontational turmoil. His Hyacinths are like giant tress in "The Lost World" or "Journey to the Centre of the Earth".

other works by Albert Durer Lucas

I am delighted to have had the "eye" in this instance to catch something special on
a budget. I have no plans to become an art dealer, but it makes sense to sell
the picture on to fund the castle, though I shall certainly enjoy it for now.


This year has been one of steady progress at the castle, though working at Lloyd's
of London as a contractor has left little time for me personally to be hands on, which
is frustrating. Gregor, my carpenter, has been pushing things forward and the utility room (shown below) is coming together.

utility room: left-hand side


utility room: right-hand side

This is a small room (the old dairy larder for the castle) but because it will become an auxiliary kitchen as well as a utility room for the kitchen wing, getting this up and running as a practical space is key. The original kitchen can then become a dining/sitting space, while the real work and cooking can go on in the utility room. Of course the original kitchen will still function as a kitchen, but any behind the scenes catering can be done in the utility room. 

The wooden counter top is from an old-fashioned gentleman's outfitters in Banbury
which closed down after 60 years. I picked it up from a retired antiques dealer, who
said it was one of his few remaining large items that he had to dispose of. He
mentioned that the wood was Scotch Pine and that therefore, very pleasingly, the counter was returning home to Scotland.

The doors, which featured in an earlier blog entry come from the Museum of Natural History in Nottingham and date from around 1928. In short, I have been using reclaim wood where practical to give a feel of genuine Victorian service areas i.e. nothing too smart or obviously modern.

Something seems to have gone wrong with the choice of taps! I had some French wall
taps planned for this space, but Gregor seems to have stuck some bottle taps on a
large bit of wood instead. A phone call to investigate, revealed that Gregor hadn't liked the French taps. I have no say in the matter apparently! :-)


The next stage is heating for the kitchen wing. I had ordered a boiler and oil tank, but cancelled the tank the following day. I had phoned up to check the spec, only to find out that the Internet has got it wrong. Anyhow, today when the boiler should have arrived, the tank arrived instead! So things are going very wrong.

However, once the heating is installed working through the winter will be more pleasant and a viable holiday let must be not far behind, though I have been saying this for about 3 years! :-)

The castle is surely a great place to host Christmas and the New Year: I wonder when this will happen? Anyhow, I wish you and your family all the best for 2018 and hope you have a great Christmas.

David


Sunday 15 October 2017

Removing Watermark


I am currently preparing a talk on Balintore Castle and came across an original 1860 drawing on the RIBA (Royal Institute of British Architects) website. This is great, well apart from the water mark! :-)


As I have a background in image processing, I though it would be fun to try to find an algorithm to remove the watermark. You can judge for yourselves how well I have done at the end of this blog entry. That's one way to keep you reading. :-)

Here is the original watermarked image:
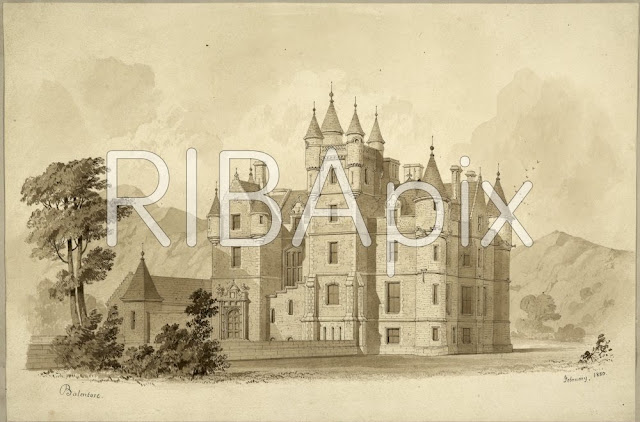
original watermarked image of castle


There are essentially 3 different areas in the image:
  1. untouched area outside of letters
  2. black line around letters
  3. area inside letters with reduced colour and contrast

As the image inside the letters is black and white and has been reduced in contrast, I wondered if this could give any clues for reconstruction? I looked at the hue (colour channel) and the saturation (colour intensity channel). There was little discernible information in the hue, but the saturation image below was a revelation and give insight into the solution.
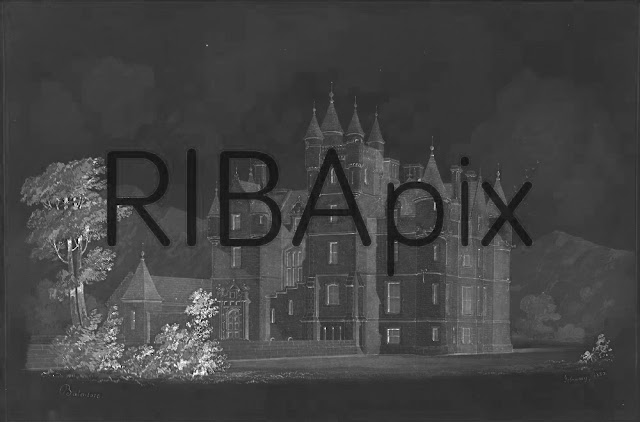
colour saturation channel
N.B. letters have near 0 colour saturation i.e. no colour information

You can see that the saturation inside the letters is essentially zero (shown by the deep black colour). This means that parts of the region inside the letters are distinguished by low saturation, and therefore can be treated differently in the restoration.

I threshold the saturation image looking for low saturation regions. By choosing a suitable value (around 47), everything below this was essentially a letter, shown by the coloured regions below. I have coloured connected regions different colours and this information is useful in the next stage.

letters thresholded from saturation and split into connected regions
In the image above there is some noise i.e. small blobs that do not form part of a letter. By eliminating small regions (less than 170 pixels), then one arrives at the 7 large regions below. Letters successfully detected! :-)


small "noise" regions removed
By growing and shrinking the letter regions, by image processing techniques called dilation and erosion respectively, one can create an edge region as below. It is important that this edge region totally covers the black letter boundary  so we can remove this. By trial and error, I had to do 1 shrink operation and 2 grow operations.



edge mask created from large connected regions
The image below may look little different from the starting-point watermarked image. However, the black boundary is now the "edge mask" I have created. Inside the letters I have increased the contrast of the black and white image to exactly match the contrast of the surrounding sepia image. This is done by a "histograming technique" making the histogram of intensity distributions of the inner image match that of the outer image.
As well as the "edge mask", I have a "letter mask" for the inside of the letters which is essentially the same as the earlier coloured blobs.
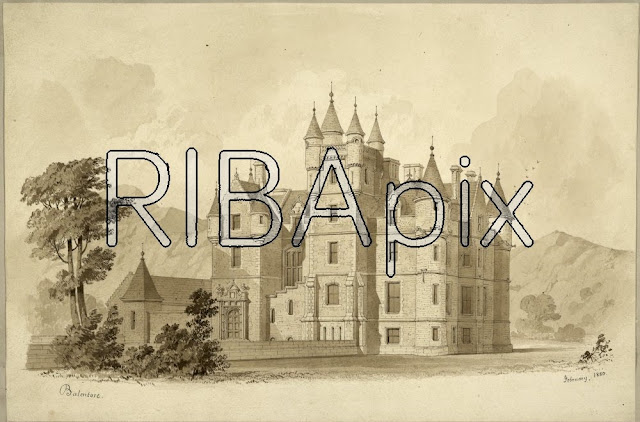

image outside letters + edge mask + contrast enhanced image inside letters 
I now want to fill in the missing detail! :-) Inside the letters I need to supply the missing hue and saturation information. In the edge mask region I need to supply the missing colour, saturation and intensity information. Thankfully there is an image processing technique called "in painting" for filling in missing regions. You will be familiar with this technique, as it the one used to digitally removes scratches from photographs.

So in simple terms, the hue and saturation information is in-painted inside the letter masks, and the intensity information is in-painted inside the edge mask. The eye is less sensitive to hue and saturation information so the large degree of inaccurate guesswork inside the big letter regions is not a problem. However, when intensity information is in-painted inside the letter mask, this looks dreadful. The eye is incredibly sensitive to intensity information. It was therefore necessary to in-paint intensity in the smallest possible region  i.e. just the edge mask, and to use the intensity information inside the letters - which demanded the complex histogram work!
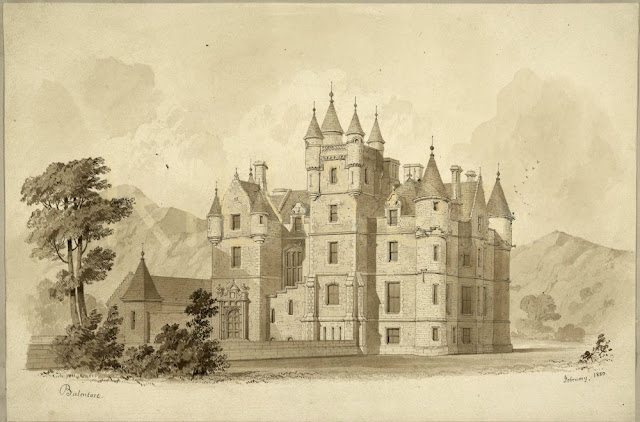

missing parts of image filled-in


Anyhow, how did I do? You can see the resulting final in-painted image above.  Some faint echos of the watermark are visible on the left hand side of the image. If I was a digital artist I could paint these out. :-) But as a mere programmer, the point of diminishing returns has been reached and this is the best I can do on a Sunday morning! :-) The code is appended.


import numpy as np
import os
import random
import cv2
from skimage.morphology import binary_dilation, binary_erosion

def hist_match(source, template, ignore_black = True):
    """
    https://stackoverflow.com/questions/32655686/histogram-matching-of-two-images-in-python-2-x
    Adjust the pixel values of a grayscale image such that its histogram
    matches that of a target image

    Arguments:
    -----------
        source: np.ndarray
            Image to transform; the histogram is computed over the flattened
            array
        template: np.ndarray
            Template image; can have different dimensions to source
    Returns:
    -----------
        matched: np.ndarray
            The transformed output image
    """

    oldshape = source.shape
    source = source.ravel()
    template = template.ravel()

    # get the set of unique pixel values and their corresponding indices and
    # counts
    s_values, bin_idx, s_counts = np.unique(source, return_inverse=True,return_counts=True)
    if ignore_black:
        s_counts[0] = 0

    t_values, t_counts = np.unique(template, return_counts=True)
    if ignore_black:
        t_counts[0] = 0

    # take the cumsum of the counts and normalize by the number of pixels to
    # get the empirical cumulative distribution functions for the source and
    # template images (maps pixel value --> quantile)
    s_quantiles = np.cumsum(s_counts).astype(np.float64)
    s_quantiles /= s_quantiles[-1]
    t_quantiles = np.cumsum(t_counts).astype(np.float64)
    t_quantiles /= t_quantiles[-1]

    # interpolate linearly to find the pixel values in the template image
    # that correspond most closely to the quantiles in the source image
    interp_t_values = np.interp(s_quantiles, t_quantiles, t_values)

    returned_image = interp_t_values[bin_idx].reshape(oldshape)
    return returned_image.astype(np.uint8)

def coloured_image_to_edge_mark(coloured_image):
   image_sum = coloured_image[:,:,0] + coloured_image[:,:,1] + coloured_image[:,:,2]
   mask = image_sum > 0
   return mask

def triple_mask(mask):
    return np.stack( [mask]* 3, axis = 2)

def get_inner_and_outer_masks(mask):
    inner_mask = binary_erosion(binary_erosion(binary_dilation(mask)))
    inner_pixel_count = np.count_nonzero(inner_mask)
    #inner_mask = mask
    outer_mask = binary_dilation(binary_dilation(mask)) # no colour abnormaility
    outer_pixel_count = np.count_nonzero(outer_mask)
    print("inner_pixel_coint = ",inner_pixel_count)
    print("outer_pixel_count = ",outer_pixel_count)
    return inner_mask, outer_mask

def balance_histograms_using_v(inner, outer):
    """
    make RGB image inner have the same brightness (i.e. v) histogram as image outer
    """
    inner_v_before, inner_hsv = rgb_to_intensity(inner)
    outer_v,        outer_hsv = rgb_to_intensity(outer)
    inner_v_after = hist_match(inner_v_before, outer_v)
    inner_hsv[:,:,2] = inner_v_after                   # edit V channel only
    return cv2.cvtColor(inner_hsv, cv2.COLOR_HSV2BGR)  # return as BGR

def fill_in(io, edge_mask, outer_mask):
    """
    http://opencv-python-tutroals.readthedocs.io/en/latest/py_tutorials/py_photo/py_inpainting/py_inpainting.html
    """
    fill_in_method = cv2.INPAINT_TELEA # other choice cv2.INPAINT_NS - makes little visible difference
    io_hsv        = rgb_to_hsv(io)
    h_before      = io_hsv[:,:,0]
    s_before      = io_hsv[:,:,1]
    v_before      = io_hsv[:,:,2]

    outer_mask_uint    = np.where(outer_mask,255,0).astype(np.uint8)
    s_after   = cv2.inpaint(s_before, outer_mask_uint, 15, fill_in_method)       # use outer mask to fill in saturation
    h_after   = cv2.inpaint(h_before, outer_mask_uint, 15 ,fill_in_method)       # use outer mask to fill in hue
    v_after   = cv2.inpaint(v_before,       edge_mask,  2, fill_in_method)  # use edge to fill in hue

    io_hsv[:,:,0] = h_after
    io_hsv[:,:,1] = s_after
    io_hsv[:,:,2] = v_after
    return hsv_to_rgb(io_hsv)

def rgb_to_hsv(im):
    return cv2.cvtColor(im, cv2.COLOR_BGR2HSV)

def hsv_to_rgb(im):
    return cv2.cvtColor(im, cv2.COLOR_HSV2BGR)

def rgb_to_intensity(im):
     hsv  = rgb_to_hsv(im)
     return hsv[:,:,2], hsv

def make_random_colour_map_with_stats(stats, pop_thresh = 0):
    n = len(stats)
    colour_map = np.zeros( [n, 3], dtype=np.uint8)
    for i in range(n):
        if ( (pop_thresh != 0) and (stats[i][4] < pop_thresh) ) or  (i == 0):
             colour_map[i] = [0,0,0]                            # make small regions and region 0 (background) black
        else:
            for j in range(3):
                colour_map[i,j] = 1 + random.randint(0,254)     # big regions are a non-zero random colou
    return colour_map

"""

Image comes from here

https://www.architecture.com/image-library/RIBApix/licensed-image/poster/balintore-castle-angus-the-entrance-front/posterid/RIBA65186.html
"""

def display_and_output_image(name, im):
    cv2.imshow(name,im)
    file_name = os.path.join( "C:\\Users\\david\\Desktop\\", name + ".jpg")
    cv2.imwrite(file_name,im)


def create_letter_mask(image_saturation):
    """
    https://stackoverflow.com/questions/35854197/how-to-use-opencvs-connected-components-with-stats-in-python

    threshold saturation to detect letters (low saturation)
    find big connected components (small connected components are noise)
    """
    connectivity = 4
    ret, thresh_s = cv2.threshold(image_saturation, 42, 255, cv2.THRESH_BINARY_INV)  # 50 too high, 25 too low
    output = cv2.connectedComponentsWithStats(thresh_s, connectivity, cv2.CV_32S)
    blob_image = output[1]
    stats = output[2]
    pop_thresh = 170
    big_blob_colour_map = make_random_colour_map_with_stats(stats, pop_thresh)
    all_blob_colour_map = make_random_colour_map_with_stats(stats)
    big_blob_coloured_image = big_blob_colour_map[blob_image]                       # output
    all_blob_coloured_image = all_blob_colour_map[blob_image]                       # output
    display_and_output_image("big_blob_coloured_image", big_blob_coloured_image)
    display_and_output_image("all_blob_coloured_image", all_blob_coloured_image)
    letter_mask = coloured_image_to_edge_mark(big_blob_coloured_image)
    return letter_mask

def main():
    """
    original image comes from here

    https://www.architecture.com/image-library/RIBApix/licensed-image/poster/balintore-castle-angus-the-entrance-front/posterid/RIBA65186.html
    """
    im = cv2.imread(r"C:\Users\david\Desktop\riba_pix_cropped.jpg")
    print (im.shape)
    display_and_output_image("image",im)
    hsv = rgb_to_hsv(im)
    image_saturation = hsv[:,:,1]                                                           # output
    display_and_output_image("image_saturation",image_saturation)

    letter_mask = create_letter_mask(image_saturation)

    # outer mask bigger than letter mask
    # inner mask smaller than letter mask
    # edge mask is between inner and outer mask and contains black line round letters (i.e. to be removed)
    inner_mask, outer_mask =  get_inner_and_outer_masks(letter_mask)
    edge_mask = np.logical_and( np.logical_not(inner_mask), outer_mask)
    edge_mask = np.where(edge_mask,255,0).astype(np.uint8)
    display_and_output_image("edge_mask",edge_mask)

    inner_image = np.where( triple_mask(inner_mask), im, 0)
    outer_image = np.where( triple_mask(outer_mask) ,0 ,im)

    balanced_inner_image = balance_histograms_using_v(inner_image,outer_image)

    before_filling_in = balanced_inner_image + outer_image                                   # output
    display_and_output_image("before_filling_in",before_filling_in)

    after_filling_in = fill_in(before_filling_in, edge_mask, outer_mask)                     # output
    display_and_output_image("after_filling_in",after_filling_in)

    cv2.waitKey(0)
    cv2.destroyAllWindows()


if __name__ == '__main__':
    main()


Sunday 1 October 2017

A Study In Pink

I am currently seeking listed building consent (LBC) to fix-up the interior walls in the main body of Balintore Castle. This is essentially all rooms not in the kitchen wing's ground floor, which is the only part of the building which has planning permission for full restoration.

Angus Council came back to me to say they needed plans with all affected rooms annotated. When I was around 4, the gift of a colouring-in book was as good as life got, and it is the tragedy of being a grown-up that one can see the pointlessness of colouring everything in when a short English phrase ("all rooms except the kitchen wing ground floor") does a better job.

Anyhow, please find appended my compliant pink colouring-in oevres . OK, I maybe enjoyed it just a little. :-)


annotated basement plan


annotated principal floor plan

annotated first floor plan
annotated attic plan


Monday 18 September 2017

My Knobs' Patina


One of the eternal debates in restoration is "how much". We have all seen over-restored buildings which have lost their character. On the other hand, one would rather that one's restored building is distinctly distinguishable from a ruin. Where is the happy middle ground?

This, in microcosm, is the same debate when polishing brass. Too much polishing and it looks like new brass; too little polishing and the metal looks too tarnished.

Anyhow, I am currently polishing a job lot of brass door knobs. I have completed the 5 on the right stopping before I reach an overly polished look - which is often the flaw with modern brass items. The 4 on the left have some remaining lacquer coating, which accounts for the "gold" colour with brown regions where the  lacquer has worn off. In fact, I initially interpreted this look as gilding coming off and I avoided polishing to stop the loss of more gilding to expose the underlying unattractive surface, which I though might be iron.

The two in the middle have the full brown patina that brass develops over time: not unattractive but not the gleaming surface the Victorians aspired to. My personal preference is to have shiny highlights where human touch would naturally keep the surface shiny and tarnishing in the hollows. This combination celebrates the range of finishes and provides contrast.

In some people's eyes, I have over-polished the knobs. However, in time these will tarnish, so you can't really get it wrong. 

You can see some of the knobs have an appealing "rose brass" colour, where there is presumably a larger copper content.

And to end with a tip: wire wool is better and infinitely faster than Brasso to polish brass. :-)


polishing of my door knobs in progress