Thursday, 24 October 2019

Treading on a Fortune?

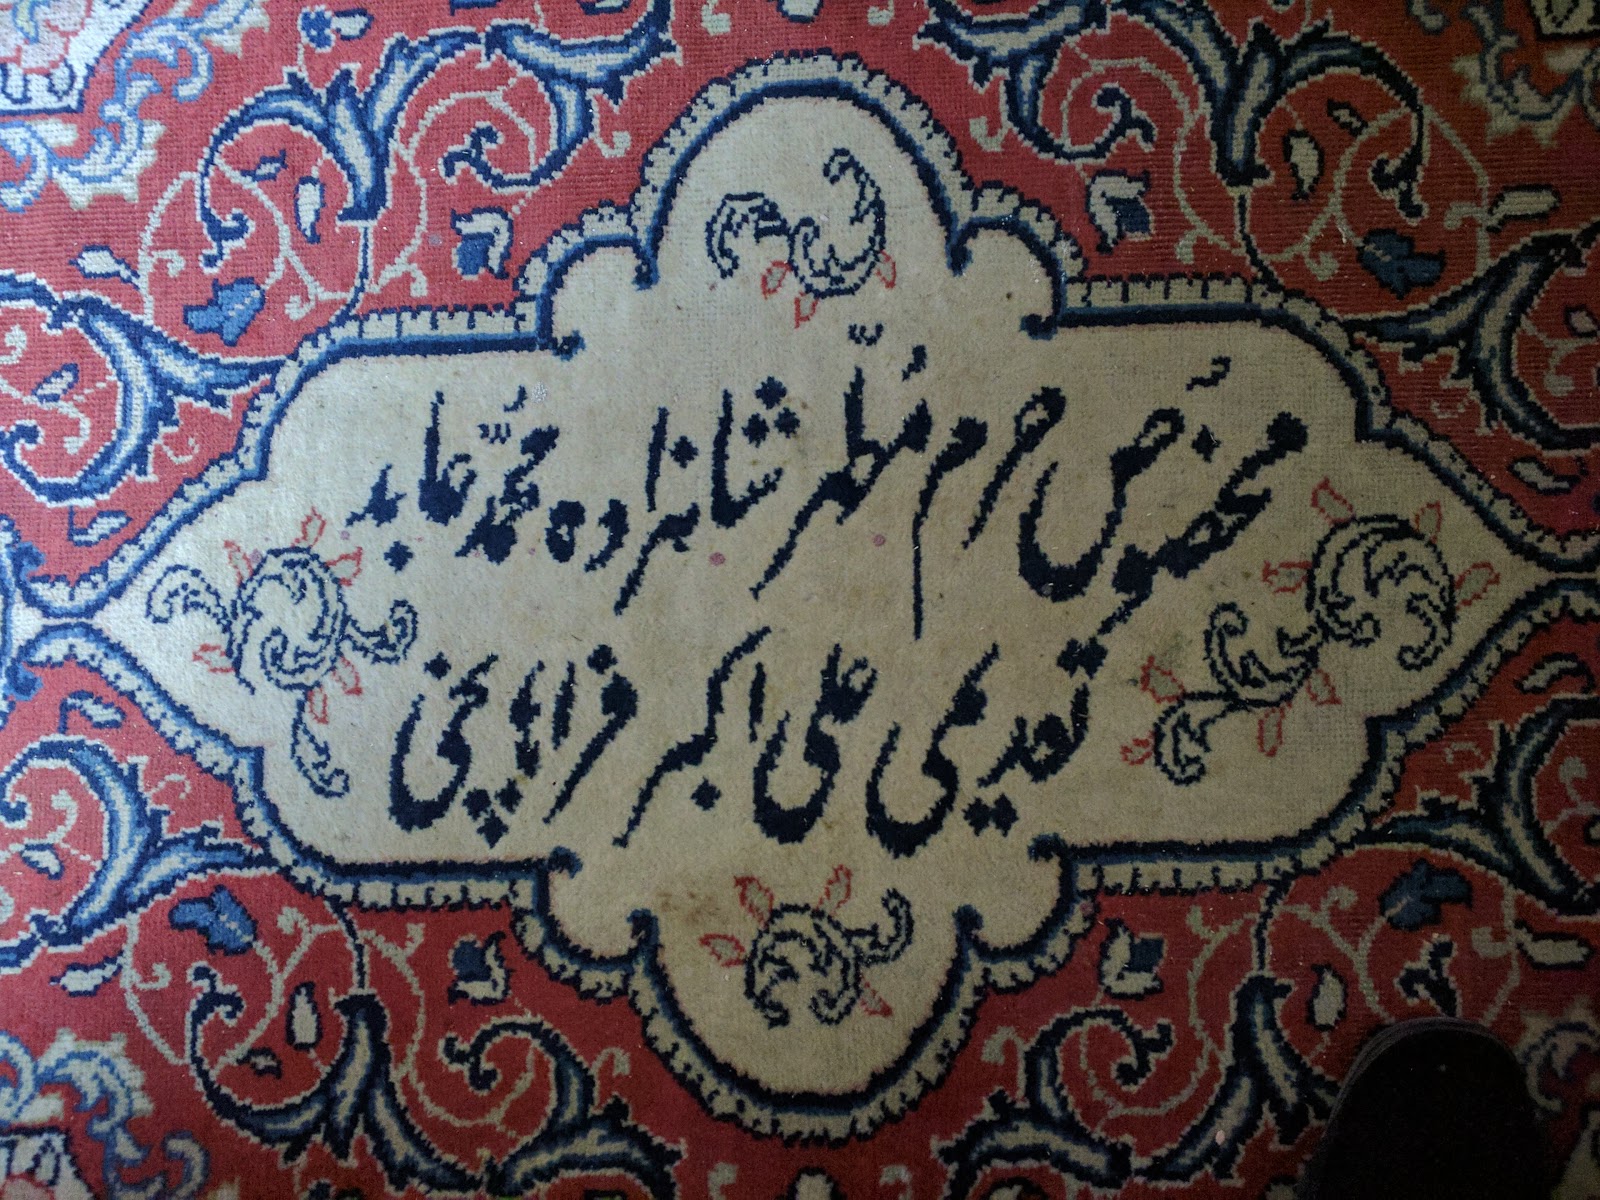
One of my rugs caught the eye of some lovely visitors of Persian extraction. Apparently, though the Arabic script is difficult to understand, the rug was specially woven for a named individual who is one of the descendants of a prophet. Apparently, lineage from prophets is revered in Islamic culture, so my rug could be worth something.


can anyone translate this Arabic - is it the key to a fortune?


As far as I was concerned, it was just a cheap woolen runner to clad the cold stone floor of a corridor. The design appealed, of course, as I love Arabic script.

Unfortunately, I did not have the presence of mind to write down the details so can anyone translate the Arabic and tell me if I am sitting, er treading, on a much needed restoration fortune?

rug with Arabic script in corridor


Saturday, 12 October 2019

Women Servants' Bed Room

This blog entry is a somewhat "dry" or to be more accurate "dry-rotten". :-) However, it reflects the genuine everyday "bread and butter" of castle restoration: solving alarming one-off repair problems. If you do not like technical detail, skip this post.

Most of the floors at Balintore Castle have been rebuilt, but a few are still as they were when I bought the building. These are the problematic floors where the underlying beams are rotten but difficult to access, either for repair or replacement. There is always the danger, of course, that removal of a section or the whole of a rotten beam causes the whole floor to collapse.

One of the problematic floors is that in the "Women Servants' Bed Room". This is room directly above the great hall and the beams are so far above the floor of the great hall, that scaffolding would have to be erected underneath to access them.  Every so often I have suggested to Gregor that the floor could be possibly repaired from above, but Gregor insisted that the scale of the work was so large that it could only be done from below and that plaster moldings would have to be knocked off the ceiling of the great hall to gain access.

Given that I am currently at the castle for a prolonged period,  Gregor and I had time to look at the various problematic areas of the floor in situ. There is nothing like being there in person to understand what the problems are and to set the brain in motion as to how these can be solved. There were around 5 areas damaged by water ingress through the roof. Importantly, it looked like these could be fixed up one-by-one. Although extensive, the damage was localised, so we could patch repair rather than replacing whole beams. Even Gregor agreed. :-) This is where you have to think on your feet as the problems are not easy. And in fact, Gregor is superb at coming up with working solutions for problems which would defeat most people. It was really productive to talk things through as we batted the ball back and forwards to develop practical solutions, be it the order of doing things or the design of a new metal bracket to tie things together.

Gregor finally set to work on the floor. I was delighted as this room is key to reclaiming accommodation on the top level of the castle. This large central room would make a superb communal lounge/kitchen serving all the bedroom accommodation in the main body of the castle.

As Gregor stripped away, the extent of the dry rot revealed was alarming. How had the floor even supported our weight? We had crossed through this room all the time to move between the east and west sides of the building. However, we have experienced this phenomenon over and over again. Everywhere the dry rot damage has been revealed to be greater than we had envisaged, but because the castle is so over-engineered the structure still remains incredibly strong.

Particularly alarming were wooden beams which ran alongside an iron I-beam. These were more or less totally gone. The ends of other perpendicular beams which had slotted into these were now dangling in this air. And as these perpendicular beams supported floor joists, the mystery of why the floor had not collapsed was all the greater.

How could we reattach the perpendicular beam to the I-beam? After discussing a complex piece of custom metal work which hooked under the perpendicular beam and over the I-beam, my suggestion was that we simply extend the perpendicular beam with a short section of wood, but put strong metal bracing plates either side to give the joint a huge amount of strength.

In the images below you can see the "after" The perpendicular beam has been extended with custom metal plates and is now sitting on top of the metal I-beam. The old wooden side beam was on the same level and where it still exists (slightly to the right), it is just a hollow shell, with cubes of dry rot inside. The floor joist is in the bottom-left corner and resting on the perpendicular beam.


custom metal plates to extend perpendicular beam so it again rests on I-beam


If we zoom out one step, you can see the floor joist has itself been affected by dry rot and has had its end cut off! The end of this beam used to be supported by resting on a ring beam which ran along a wall. This ring beam had also succumbed totally to dry rot.


floor joist renting on perpendicular beam - rotten end of joist has been chopped off


If we zoom out yet anther step, you can see the floor (which we have sheet-ed temporarily in OSB (Oriented Strand Board) which somehow you can walk on!


OSB floor resting on floor joists


As Gregor stripped out more and more, I became increasing concerned that the whole structure would just give way, and finally persuaded him to put in some new support between stripping phases. However, Gregor was as good as his word and area-by-area the floor was patch repaired. Only one major hole caused by water ingress remains to be fixed. And there will still have to be a final pass where we replace the OSB with proper floorboards. The floor of the room still has a long way to go, but most importantly it has been saved and is now safe. A longstanding weight on my mind of "How can we possibly fix this?" has been lifted.


Thursday, 8 August 2019

Mezzanine Tower Bedroom


One of the current tasks at the castle is smartening up the accommodation in the entrance tower. Permission has been formally obtained from Angus Council to make repairs with plasterboard in the castle as a whole, via the listed building consent mechanism. In fact, this permission was given over the phone 20 years ago in early discussions with the then conservation officer. However, before starting work I wanted the security of a bit of paper rather than verbal consent, due to the turn-around in Council staff. Having to line bare walls in the castle in lathe-and-plaster would have rendered (no pun intended) the restoration out of my budget, so I needed to establish the viability of plasterboard at a very early stage.

We decided to tackle what I call the "mezzanine bedroom" in the entrance tower first because it is a simple box i.e. the least complicated room in terms of shape. This room has a very low ceiling (for Balintore), because the levels in the entrance tower don't really tally with those in the rest of the castle except on the very top floor and this bedroom's compromised height allows the top level connection to work. In any normal house, the ceiling would be regarded as tall! :-) 


The back wall in the picture below was virtually intact so we just had to patch the lathe and plaster. In contrast the wall on the left hand side, has totally gone - the few remaining sections of lathe and plaster were totally rotten at the back. Greg plastered the whole left hand wall. The finish he obtained was mirror smooth. What is unbelievable is that this is the first plastering he has even done!!! Greg has discovered an innate talent, and has been a delight to observe this happening and see him take pride in each new plastering job. You can see a bit of plasterboard at 45 degrees, which mirrors the existing coving minus the fancy moulding, which is tomorrow's challenge.
repairing walls in mezzanine bedroom

As Greg was giving the wall a first coat of white paint (which is how plasterers gauge how smooth the first pass has been), he spotted a small fragment of existing wall-paper which I had never noticed. I came in with my camera to photograph for the historic record (see below) and Greg managed to get the fragment off the wall intact.


remaining fragment of original wallpaper


It is a rather dull piece of wallpaper. This pattern is seen in a more vibrant blue colour way in the room above, which makes me wonder if it is actually very badly faded or simply in drab browns. We have been discussing the replacement colour for this wall: white makes the moulding disappear, magnolia just looked insipid, so we are contemplating going bold with a rich teal or cerulean. The teal was inspired by a memory of an artistic friend's wall colour choice shown below.


inspirational teal wall

Sunday, 14 July 2019

Mischief Motif

When I discovered that two of today's vistors to Balintore Castle were professional musicians (a violinist and a composer), I couldn't resist insisting that instead of signing the visitors' book, that they pen an original composition. Naturally, when said musicians become world famous, the vistors' book will itself become extremely valuable.

It is a credit to their musicianship and good-natured tolerance of a laird's eccentric nay mischievous whim, that they both obliged in fine form. The "Balintore Castle Motif" was personally premiered for me on a smart phone app, and it sounded suitably moody and mysterious. 

Given the monumental nature of the restoration task at Balintore, then I fear the "Jig" may yet remain unfinished, but thanks to Haydn, there is a good provenance here. How much does an original Haydn manuscript go for?


today's page from the Balintore visitors' book

Friday, 12 July 2019

Summer Flowers

I had only intended dressing the kitchen wing with flowers for the open day earlier in the year. However, fresh flowers are so transformative and joy-bringing that I have kept up the tradition when visitors are expected and of course the arrangements will survive for a week or so.

This year has been amazing for Foxgloves (Digitalis purpurea) with some banks in the vicinity of the castle being completely carpeted. When I was looking for something from mother nature's discount flower shop to shove in a vase, there was no debate. It is impossible not to put the fallen bells on the ends of one's fingers, and Wikipedia informed me today that accordingly the name Digitalis comes from the Latin word for finger. Duh! I had never put the pieces of this jigsaw puzzle together until today.


The display below is something Greg created, which I then augmented by shoving in more spikes (including the rarer white and pink flowers) to augment the common purple on the principle that nothing succeeds like excess.


foxgloves from the castle grounds


A friend from Oxford brought me some lovely yellow roses on a recent visit. This was so appropriate given my recent predilection for fresh flowers, and I placed them strategically on the dining table.


the gift of yellow roses

Monday, 8 July 2019

Barn Find Bedside Cabinets

One item which holds its value as an antique is the humble bedside cabinet. The reason is that these pieces of furniture are eternally useful and even smaller modern interiors can accommodate them. It is normally paired items that come at a premium, but even a single well-made bedside cabinet can fetch a good price.

While rummaging round a dark outbuilding that was being cleared, I stumbled across two identical units: apparently these were base sections for an upper level gun cabinet.  However, they jumped out immediately as suitable for bedside cabinets. My quest for bedside cabinets has lasted many, many years so I got very excited and quickly asked if they could be for sale. They were - hurrah!


Once I got them in the light, I realised they were very faded. They are rough provincial pieces made by a local carpenter, but having said that, little details such as chamfered edges show they have been put together with a great deal of care. They are solid pitch pine, with just the teeniest bit of dry rot in one. Both have an oak back rail. 

I stained the cabinets to a more consistent dark colour. For comparison purposes, the photo below has one cabinet before staining on the left, and the other cabinet after staining on the right. In the photo the stain looks a little too dark, but this is just an artifact of the camera's auto-exposure. In fact, I spend a deal of time and effort to get the tone right by eye. 


barn find cabinets before and after staining


After staining, I sealed the units using a clear furniture wax. The final result can be seen below with the cabinets installed in one of the castle's kitchen wing bedrooms.


cabinets installed in a Balintore Castle bedroom


Saturday, 1 June 2019

Putting Humpty Together Again

Supplies for restoring a castle are not, unfortunately, to be found at your neighbourhood DIY superstore. Sometimes bespoke items have to be manufactured, such as a recent set of steel roof brackets which will no doubt feature as a future blog item. Sometimes, one has to bite the bullet and buy an antique item from a dealer. Before the cash register digits blur in front of your eyes, I should point out that sometimes there is another way.

Around a fortnight ago, I found out some old sheds were being cleared and I was invited to see if there was anything I could use. To most people the contents of the sheds would be period junk that they had absolutely no use for. To me, there was a chance of hitting gold ...

As I wandered around, I found a pile of old door facings that looked to be, more or less, identical to those at Balintore.  When I got back to the castle I put a sample length of the found door facings on top of a bespoke door facing I had made some time ago - see the photograph. They are identical in width and profile, but the direct copy of the Balintore original at the bottom is just a few millimetres thicker. This is the type of difference that simply won't be noticed. The result is that I can recycle the whole bundle of wood in the shed - hurrah!


door facings: one on the top was found in a shed; the one underneath is a copy of a Balintore original.

Also in the shed was a wooden crate of large old lamp chimneys with a few oil lamp components on top. I have been looking for large glass chimneys for years!!!!!!

Let me explain.

Glass chimneys and glass shades of old lamps are extremely fragile - almost as vulnerable as Humpty Dumpty. :-) The result is that most second hand oil lamps for sale are missing both. I have a couple of antique oil lamps, which are the two on the left below. My favourite has a blush cranberry milk glass font with gadrooning and textured Art Nouveau honeysuckle detailing. It is my favourite as I found it in an antique shop for £20 and knew this was around a quarter of the market price. My friend Andrew hates it with a vengeance and calls it the "brain" lamp. Decency prevents me telling you what my slater said of it. Anyhow, the other oil lamp with a clear glass font on top of a fluted brass column, was no doubt a similar bargain.


before: my non-functioning oil lamps

In an attempt to get these working again I bought a box of glass chimneys at an auction for a fiver. All the chimneys turned out to be too small.  :-( Finally, I decided to just buy an oil lamp with funnel and shade to get something up and running. I knew the lamp was a 1980's reproduction, but no matter, and I drove the 30 miles or so to pick up the eBay item, to ensure the shade and chimney stayed intact. This is the brass lamp on the right.

The brass lamp has given good service at the castle. We would use this as the only source of light to recreate the full Victorian experience of being at the castle. Using an oil lamp instead of an electric light, totally changes the ambiance. It is much dimmer and warmer in colour, and draws people together as you have to huddle round the lamp to see what you are doing.

Then earlier this year, when I was away, some visitors must have knocked over my one working oil lamp, smashing both shade and chimney. They did not tell me about this and I came back to the castle to find all the bits lying on the floor. :-( This is one thing I really hate: people breaking your possessions and not telling you. It's not like I am going to charge people money, because accidents do happen, but it does mean I have to go into inquisition mode and ask "Who broke this?" which is never a nice thing to have to ask, or be asked i.e. there is insult on all sides added to the injury.

Anyhow, given all three of my oil lamps were missing bits and in consequence were not working, the box of oil lamp bits was like gold. Today I managed to get all three oil lamps back into working order again! The brass oil lamp could still benefit from a shade - there were only two suitable shades in the box - but the lack of a shade does not stop it working. The actual flame of an oil lamp is sufficiently bright, that it is somewhat uncomfortable to look at directly. The replacement chimney in the centre is 3" in diameter, and the other replacement chimneys are 2.5". The box held 3", 2.5", 2" and 1.5" chimneys, so clearly they came in gradations of half-an-inch.


after: all oil lamps back in working order due to shed find
A bit of plastic (or so I thought) fell out the box. How did that bit of modern rubbish get in there?, I wondered and was going to throw this out. Before doing so, I realised the clear material was not plastic but mica, and that the item was something to clip onto the funnel to either prevent sooting or reduce the fire risk. The mystery item is modelled by the brain lamp below - who knew? 


mica attachment for oil lamp chimney

The rather moving aspect is that the chimneys were wrapped in pages from an edition of the "Town and Country" magazine dated 9th August 1950. This is a whole lifetime ago: 69 years. So whoever packed the funnels so carefully is likely to be dead. Unpacking the box, and unwrapping those shades felt like a very sacred connection to the nameless packer. I am very grateful to that person, who recognised the value of these items and the fact that they might one day in the future be re-used. They were not wrong.