Tuesday, 28 August 2018

One Step Forward; Two Steps Back

While replacing the third of three plastic downpipes on the exterior of the kitchen wing with cast iron ones, we hit a problem. The ground was dug up at the foot of the new downpipe so we could connect it up. However, the drain here was simply not draining. It looks like the rain from the roof has just been soaking into the ground rather than being taken way - probably for many years.

I stuck my hand down the drain and pulled out as much earth as I could. This did not unblock it. :-( The drain pipe seemed to be going under the castle rather than away from the castle. Gregor and Greg excavated round the drain, and the first section of pipe appeared to be a trap. The trap had a U-bend, but as the U went up again the pipe was fractured. The crack was around 15mm wide, enough to let earth in and block things. Gregor shoved a length of thin but rigid plastic into the crack and wiggled. This just did enough to unblock the drain and we could hear the water drain away with an echo-y splash into the underground tank in the middle of the service courtyard. 

After much debate we reasoned that we would have to either seal the crack or install a new drain, because if we did nothing the earth blockage would recur. In any case, the crack meant that a significant amount of water, perhaps the majority, entered the ground.

Greg excavated around the ceramic trap to free it, and with much digging in hard stony ground and with much wiggling, it finally came loose. You can see from the picture of the trap below that the crack is at an angle and that re-joining would be next to impossible.

the original Victorian trap with cracked U bend


Reluctantly we replaced the trap with an inpection chamber which arrived with Plumbageddon, a mass purchase of plumbing bits and bobs. Plumbaggedden, described in an earlier blog entry, was starting to pay dividends.

The inspection chamber outlet was connected by a rubber adapter to where the old trap was connected - once the salt glaze pipe was given a neat vertical edge using a saw. The input pipes were at a higher level so could not be fed into the inlets but instead fed-in from above. Here you can see the kitchen sink drain - a white plastic pipe inside the original lead pipe and the land drainage pipe from the area around the kitchen  - which terminates in a 90 degree grey bend.

replacement inspection chamber


The next picture shows the new connection from the square downpipe; two black riser chambers and a cast iron manhole cover. All bits courtesy of Plumbageddon. All that remains to be added are three inspection chamber inlet blanks, and then we can back-fill the hole. For once Plumbageddon did not oblige, and I had to order the blanks from the Internet.


fully connected inspection chamber with risers and manhole cover


The final image shows the third of the three newly installed cast iron downpipes, with the newly installed drain. Hurrah! Having to rework the drainage was totally unexpected, and took a couple of days. Moral was low at the end of yesterday as we had not been able to unblock the drain, did not know what was happening underground, and had no idea how to solve the problem. So from the high of seeing the third cast iron downpipe installed, we were then cast down by not knowing how we could ever get it to work. Apparent forward progress can actually make one realise that one has actually gone backwards. :-(


new cast iron downpipe and new drainage to handle the water properly

Many thanks to Greg and Gregor for persevering, and particularly Greg for digging for most of today while stuck in a deep muddy hole. I did some digging but then Greg insisted "That's what I'm here for.". :-)  

Yes, the new drain is sticking out of the ground at the moment. However, the top riser chamber will be cut down to meet the final ground level, once this has been established.




Saturday, 25 August 2018

Civilisation Delta

I have to continually remind people that conditions in a castle undergoing restoration are far from their palatial expectations, and in fact may more accurately be described as squalid.

There is one working WC in the castle: obviously an essential for the many craftsmen who work on site. However, for the last 6 years or so the accompanying wash-hand basin has been a plastic bowl which you have to empty down the WC.

Some visitors were arriving late yesterday, and suddenly I decided enough was enough so earlier in the day I asked Gregor and Greg to install a proper wash-hand basin. I had picked up this small repro Art Deco basin a few months back at an auction for £12 which, as it turned out, fitted perfectly into the window opening. One doesn't feel one can ask for oneself, but I could ask on behalf of others.

The basin is sitting at a somewhat wonky angle, but it will have to be taken out anyway when a proper window is fitted. At least it is fully functional, and it is a major advance for the level of civilisation at the castle.


first working bathroom basin installed at the castle


Downpipes: Update

A brief update to yesterday's entry. Adding paint thinner to the grey cast iron primer made it go on smoother (without the unevenness problem), made it easier to handle, and made it go further. Win, win, win! 

Two of the three square cast iron downpipes on the exterior of the kitchen wing have now been installed and painted as shown below.

kitchen wing cast iron downpipe 1 of 3

kitchen wing cast iron downpipe 2 of 3

Friday, 24 August 2018

Downpipes: Before, During and After

When I bought Balintore Castle most of the downpipes were missing: long since removed by lead and cast iron bounty hunters. To get the roof draining properly as quickly as possible and as cheaply as possible, plastic downpipes were installed everywhere. They certainly did the job, but aesthetics dictated that they were only a temporary solution.

I have been scouring eBay for years for reclaimed cast iron downpipe. The square profile at Balintore is much rarer than the round, and despair set in. However, a few years ago I spotted 12 lengths for sale just outside Reading. I bagged this for £150. The retail price for new is around £200 a length i.e. £2400!

These reclaimed downpipes have been stored in the basement of the castle. During my current holiday at the castle I insisted that these be installed: Gregor and Greg got on the case yesterday. The kitchen wing is getting close to "holiday let" readiness, so it made sense to replace the three lengths on the exterior of this section of the castle first. The photographs show the "before, during and after" of  the replacement of the plastic by cast iron.  All photographs are from today:


remaining reclaimed cast iron downpipes in basement

before: temporary round grey plastic downpipe
during: Greg pointing stonework before replacing downpipe
after: replacement square cast iron downpipe in position - top section still to be painted


original downpipe profile
replacement downpipe profile- what a match!

The original cast iron downpipe was galvanised so has a somewhat matt silver/grey appearance. This looks well, and the zinc coating has certainly done its job over the last 160 years. There is not a hint of rust. To emulate this look I found a cast iron primer which is grey in colour. Protection and no need to paint in a one-er! I initially used this primer on replacement gutters last year, but when we tried it on the downpipe yesterday it seemed rather gloupy and went on in a rather uneven manner, with the paint surface breaking up almost like oil on water. When dried, the effect was OK but in the pursuit of perfection Gregor brought in some paint thinner today to see if this might help.

It is only now putting the original and reclaim downpipe photos together on this blog, that I see how exact a match has been achieved - hurrah!

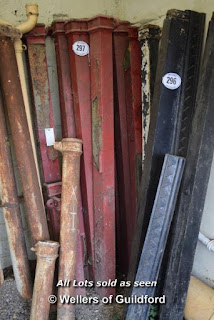
I got a second job lot of "square" downpipe from a Bristol architectural yard sell-off earlier in the year for £30. Well, it was advertised as square but is actually 3" by 4" instead of the required 4" by 4". As it is the right style, I suspect that the difference will not be noticed by eye, if used in selected locations. After all, I was fooled by the auction photograph below (lot 297). With a 2D image you cannot tell the difference between perspective and dimensional difference. 
Of course, even more is required: one has to pipeline one's downpipes! :-)


second job lot of reclaim downpipe